Manage tab
The Manage tab (Config) is the device-management workspace. Discover and select devices in the sidebar, then configure, update, and test the selected device in the detail pane. Most LAN actions require hapbeat-helper and an online device.
At a glance
Section titled “At a glance”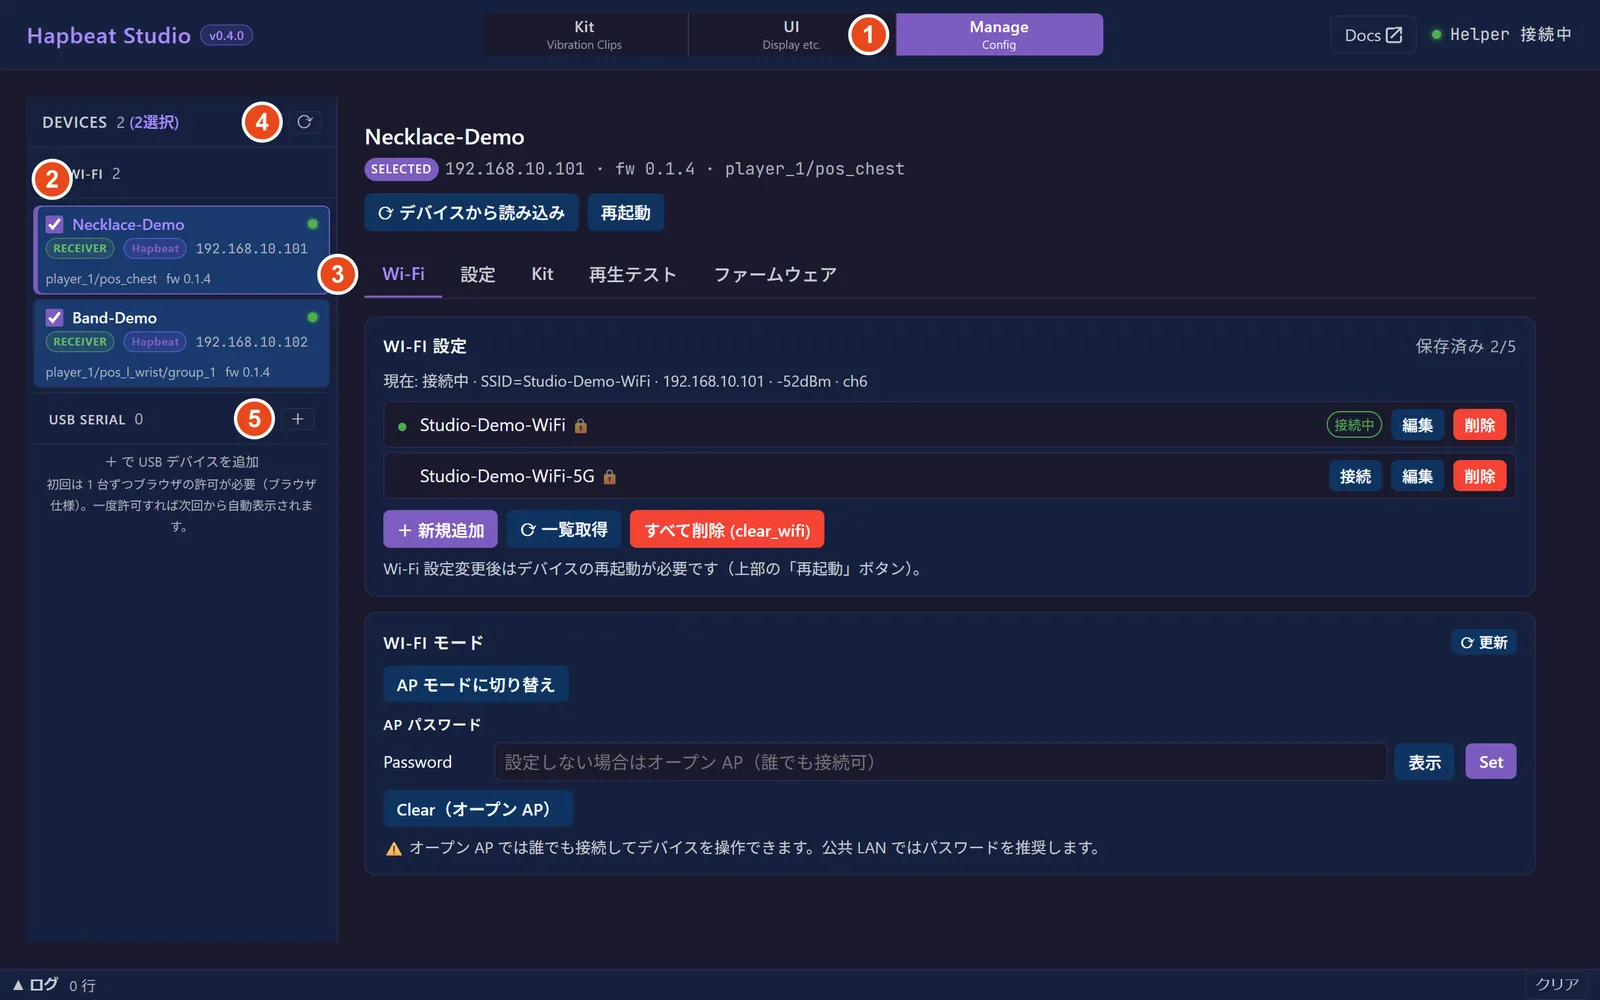
- Tabs — Kit / UI / Manage.
- Device selection — check or click a card.
- Sections — Wi-Fi / Settings / Kit / Playback test / Firmware.
- Refresh — asks Helper to rescan.
- USB add — adds a directly connected USB device.
Sidebar: device list
Section titled “Sidebar: device list”LAN devices
Section titled “LAN devices”LAN devices discovered through mDNS and UDP broadcast appear as cards.
- Green dot means online. A red × marks offline; click it to hide the card temporarily. It returns automatically when the device reconnects.
- Check boxes allow multi-selection. Click selects one; Ctrl adds; Shift selects a range. Wi-Fi and OTA use the selected target set.
- Cards show role badges (receiver / sensor / broker / transmitter), a Hapbeat pill, an AP pill when applicable, IP / mDNS address, and firmware version.
- OTA cards show
⚡ OTA [phase] N%, then success or failure.
The first device is selected automatically and shown in the detail pane.
USB Serial devices
Section titled “USB Serial devices”USB devices work through Web Serial and do not need Helper.
- Use + to add a device; browser permission is requested only on first selection.
- Cards use
#numberbecause the browser cannot expose COM-port names. Use↻ Identify(get_info) to retrieve device name and firmware. - Open a one-device configuration connection for
get_infoand Wi-Fi configuration. Use check boxes to select multiple devices for parallel flashing. - Cards show waiting, writing, complete, or failed state.
Without Helper, the pane explains that LAN discovery, configuration, OTA, and Kit deployment are unavailable while USB Serial remains usable. With Helper connected but no device found, it displays discovery progress.
Onboarding wizard
Section titled “Onboarding wizard”With an empty sidebar, the detail pane shows the three-step first-setup wizard:
- Serial connection — connect USB, choose
+, then connect the card. A responding flashed device goes to step 3; no response goes to step 2. - Flash firmware — choose Hapbeat or peripheral and use Serial flash. Completion moves to step 3.
- Configure Wi-Fi — power-cycle, reconnect, then set SSID and password.
Detail header and section availability
Section titled “Detail header and section availability”The header shows name, selected state, role / AP badge, IP, firmware + build SHA, mDNS address, and offline state.
- Read from device calls
get_info, Wi-Fi state, and profiles; receivers also read AP status and OLED brightness. - Restart calls
reboot; someset_*changes take effect only after restart.
| Role | Available sections |
|---|---|
| receiver (UDP) | Wi-Fi / Settings / Kit / Playback test / Firmware |
| receiver (MQTT) | Wi-Fi / Settings / MQTT / Kit / Playback test / Firmware |
| ESP-NOW stream receiver | ESP-NOW / Firmware |
| sensor | Wi-Fi / Settings / MQTT / Sensor / Firmware |
| broker | Wi-Fi / Settings / MQTT / Firmware |
| transmitter | ESP-NOW / Firmware |
The page switches to Wi-Fi automatically when it detects disconnected Wi-Fi; ESP-NOW receivers switch to ESP-NOW.
The Wi-Fi section displays current connection state, SSID, IP, RSSI, and channel. list_wifi_profiles lists profiles with active mark, SSID, password indicator, Connect, password-only Edit, and Delete.
- Add a profile up to the device limit; refresh list or clear all (
clear_wifi, confirmation required). - Helper can scan the host OS for SSID candidates, ordered by signal strength. Opening Add automatically scans;
⟳ Scanrepeats it. - Use
set_wififor add-and-connect or update-and-connect. With multiple selected USB devices, apply the same Wi-Fi settings in parallel. - Switch STA ⇄ AP, and set / clear an 8–63-character AP password. An open AP is unsuitable for public environments.
Restart the device after changing Wi-Fi.
Settings
Section titled “Settings”- Name: up to 32 characters through
set_name; input history is offered. - Address:
[prefix/]player_N/pos_xxx[/group_N]; set optional prefix, player 1–99, position, and group 1–99 or empty for all groups, then apply withset_address. - UI Config: choose
ui-config.jsonand callwrite_ui_config. For visual editing, use the UI tab. - Debug information:
get_debug_dumpshows battery, volume, ESP-NOW, Wi-Fi, application connection, audio, and firmware runtime / heap data.
AP mode needs firmware ≥ v0.1.0. Changing AP / normal mode asks for confirmation and restarts the device.
The Kit section manages Kits already installed on the device.
- Refresh with
kit_list; each Kit expands to show version, event count, and Delete (kit_delete, confirmation). - Click a
> FIREinstall-clip Event to test withpreview_event; copy its Event ID for mappings. ♪ CLIPstream-clips are display-only here because they play only through SDK streaming.- Firmware ≥ v0.1.3 is required to display event amp; older devices show
amp ?.
Playback test
Section titled “Playback test”CLIP streaming test
Section titled “CLIP streaming test”Browse a local WAV folder and stream it to selected LAN devices. The UI supports folder breadcrumbs, 📁 .., keyboard, double-click, and drag navigation; play / stop / pause / resume; seeking; and playback position. The Intensity slider (0–100%) is a live CLIP multiplier and does not affect FIRE. Selecting only USB devices shows an unsupported warning.
FIRE command test
Section titled “FIRE command test”Enter an Event ID (last five inputs are remembered), then send PLAY (preview_event, gain 1.0), STOP, or PING. For broadcast tests, enter Target such as player_1, */chest, or empty for all devices and use PLAY ALL / STOP ALL.
Firmware
Section titled “Firmware”Choose a source, variant, version, and transport, then write firmware over LAN or USB.
- Firmware library: production uses GitHub Releases; development uses
.piobuilds. Filter Hapbeat / peripheral, choose a board variant, and select current or archived version. Version, role, transport, board, release date, and artifact sizes are shown. - Local
.bin: choose any binary; its handle is retained in IndexedDB. A merged image is automatically sliced to its application section. - Wi-Fi OTA: writes selected firmware over LAN and restarts automatically. Multiple LAN devices are written sequentially. A stalled progress line after 3 seconds offers Cancel to drain the TCP session.
- USB Serial: writes directly without Wi-Fi. Multiple selected ports write in parallel. Erase-before-write and Flash erase warn because Wi-Fi profiles and names are removed. Re-select COM port to change target.
Studio validates board mismatch before write. OTA validates chip ID and image form before upload.
ESP-NOW, MQTT, and Sensor
Section titled “ESP-NOW, MQTT, and Sensor”- ESP-NOW: configure channel 1 / 6 / 11 consistently across transmitter and every receiver. Receivers set default Gain 0–1; transmitters set input level 0–100.
- MQTT: broker host / port, client list and connection status, topic registry, message metrics, and connection flow. See MQTT alerts.
- Sensor: live sensor values and input-to-Event-ID mapping with a live adjustment view.
Dependencies and persistence
Section titled “Dependencies and persistence”- Without Helper, LAN discovery, configuration, OTA, and Kit deployment cannot run. Features may require Helper
MIN_HELPER_VERSION0.1.3 or later. - Offline devices disable
get_*/set_*calls. Serial configuration opens one master connection at a time, while checked cards can flash in parallel. - Some features depend on role and firmware: OLED brightness is for Hapbeat receivers, AP mode requires ≥ v0.1.0, and Kit amp display requires ≥ v0.1.3.
Device configuration—Wi-Fi profiles, name, address, AP, OLED brightness, MQTT, and sensor mapping—persists in device NVS. Studio UI state and input history persist per machine in localStorage; selected .bin and streaming-folder handles use IndexedDB.