Getting Started
This page walks you through playing vibration from a wireless Hapbeat (Duo WL / Band WL) via Studio over Wi-Fi UDP.
Hapbeat SDK Overview
Section titled “Hapbeat SDK Overview”The Hapbeat SDK has two flows: the Setup & Design flow (Studio + Helper) and the Game / App Runtime flow (direct SDK connection).

Setup & Design Flow (this page)
Section titled “Setup & Design Flow (this page)”- Hapbeat Studio (browser + local files): A web app for designing vibration waveforms, display settings, Wi-Fi configuration, and firmware flashing.
- hapbeat-helper (CLI daemon): A PC daemon installed via
pipx install hapbeat-helper. Relays communication between Studio ↔ TCP, device ↔ UDP, and handles mDNS discovery. - Hapbeat (Duo WL / Band WL): ESP32 fixed runtime. Manages the Kit library, haptic output, Wi-Fi SoftAP/STA, and UDP reception.
Game / App Runtime Flow
Section titled “Game / App Runtime Flow”- SDKs such as the Unity SDK send haptic events from Quest / PC / smartphone to Hapbeat over Wi-Fi UDP (unicast to discovered devices by default; it falls back to broadcast only while no device has been discovered yet).
- Simply bind events like
onClickorOnCollisionEnterto haptics — no extra configuration needed at runtime. - Studio and Helper are not required during app execution.
What You Need
Section titled “What You Need”- PC (Windows / macOS)
- Python 3.9 or later (verify it is installed before proceeding)
- If not installed, download from: https://www.python.org/downloads/
- Chrome or Edge browser (Web Serial / File System Access APIs required)
- USB-C cable (data-capable — charging-only cables will not work)
- 2.4 GHz Wi-Fi LAN (Hapbeat supports 2.4 GHz only)
- Hapbeat (Duo WL / Band WL)
Step 1 — Install Helper
Section titled “Step 1 — Install Helper”Open Command Prompt / PowerShell (Windows) or Terminal (macOS) and run the commands below. The working directory does not matter.
Windows:
py -m pip install --user pipx && py -m pipx ensurepathpipx install hapbeat-helpermacOS:
brew install pipx && pipx ensurepathpipx install hapbeat-helperAfter installation, start Helper with:
hapbeat-helper startFor detailed OS-specific instructions and troubleshooting, see Install Helper.
Step 2 — Open Studio
Section titled “Step 2 — Open Studio”Open https://studio.hapbeat.com/en/ in your browser.
Confirm that “Helper connected” appears in green at the top of the page. If it does not appear, Helper is not running or port 7703 is blocked (see Install Helper).
Step 3 — Configure Wi-Fi and Write UI to Hapbeat
Section titled “Step 3 — Configure Wi-Fi and Write UI to Hapbeat”Connect Hapbeat to the same Wi-Fi network as your PC and write the display UI.
-
Connect Hapbeat to your PC with a USB-C cable.
-
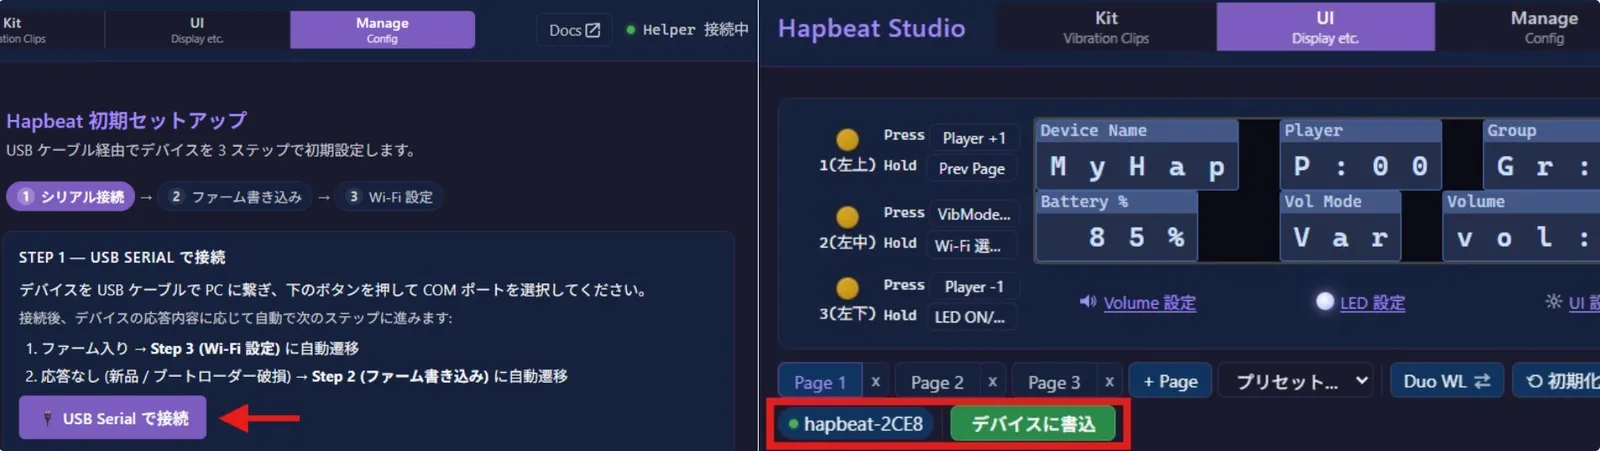
Open the Manage tab in Studio and follow the on-screen instructions. Click [Connect via USB Serial] in Studio to establish a serial connection to Hapbeat. Follow the prompts to join Hapbeat to the same Wi-Fi network as the PC running Studio.
If there is no response after connecting via serial, flash the firmware first: Initial Setup
-
Open the UI tab, select your device, and click “Write to device”. This writes the display UI to Hapbeat. Note: writing is not possible over a serial connection alone.
Step 4 — Play from the Library to Verify
Section titled “Step 4 — Play from the Library to Verify”Confirm that Studio can trigger vibration on Hapbeat over Wi-Fi UDP. You do not need to create or deploy a Kit at this stage.
-
Select a working directory (first time only) Click [Choose Folder] in the left panel and select any folder on your PC. This will be the location where Kits are created and saved.
-
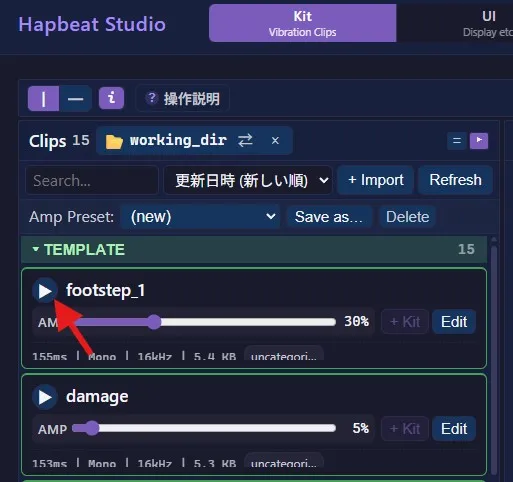
Select a template waveform from the library in the left panel. A list of built-in sample waveforms will appear.
-
Play it and confirm that Hapbeat vibrates.
If Hapbeat vibrates, setup is complete. You can now proceed to the Unity SDK.
Next Steps — Integrate with Your App via SDK
Section titled “Next Steps — Integrate with Your App via SDK”Your Hapbeat playback environment is ready. Next, trigger vibration from your application (game / VR / installation) through an SDK.
For Unreal SDK, Creative Kit, and other upcoming integrations, see Coming Soon.
Further Reading
Section titled “Further Reading”For a deeper understanding of the architecture:
- Architecture Overview — Roles of Studio / Helper / SDK / Firmware
- Communication Model — Wi-Fi UDP unicast and ESP-NOW
- Gain Architecture — Responsibility split between Studio and SDK
Reference & troubleshooting:
- Contracts overview — Protocol details
- Q&A