Hapbeat Overview
Hapbeat is a wireless haptic device you wear on your body. It contains an ESP32 and receives haptic events from games, apps, or Studio via Wi-Fi UDP, then plays them back as vibration. This page covers the features of each hardware model and operations that can be performed directly on the device (buttons, OLED, SoftAP switching).
For initial Wi-Fi setup and firmware flashing, see Initial Setup.
Product Lineup
Section titled “Product Lineup”| Model | Worn On | Channels | Primary Use |
|---|---|---|---|
| Duo WL | Neck | 2 ch (left/right independent) | VR / games requiring spatial haptics or full-body sensation |
| Band WL | Arm, leg, torso, etc. | 1 ch | Localized feedback to a specific body part such as arm or leg |
Duo WL
Section titled “Duo WL”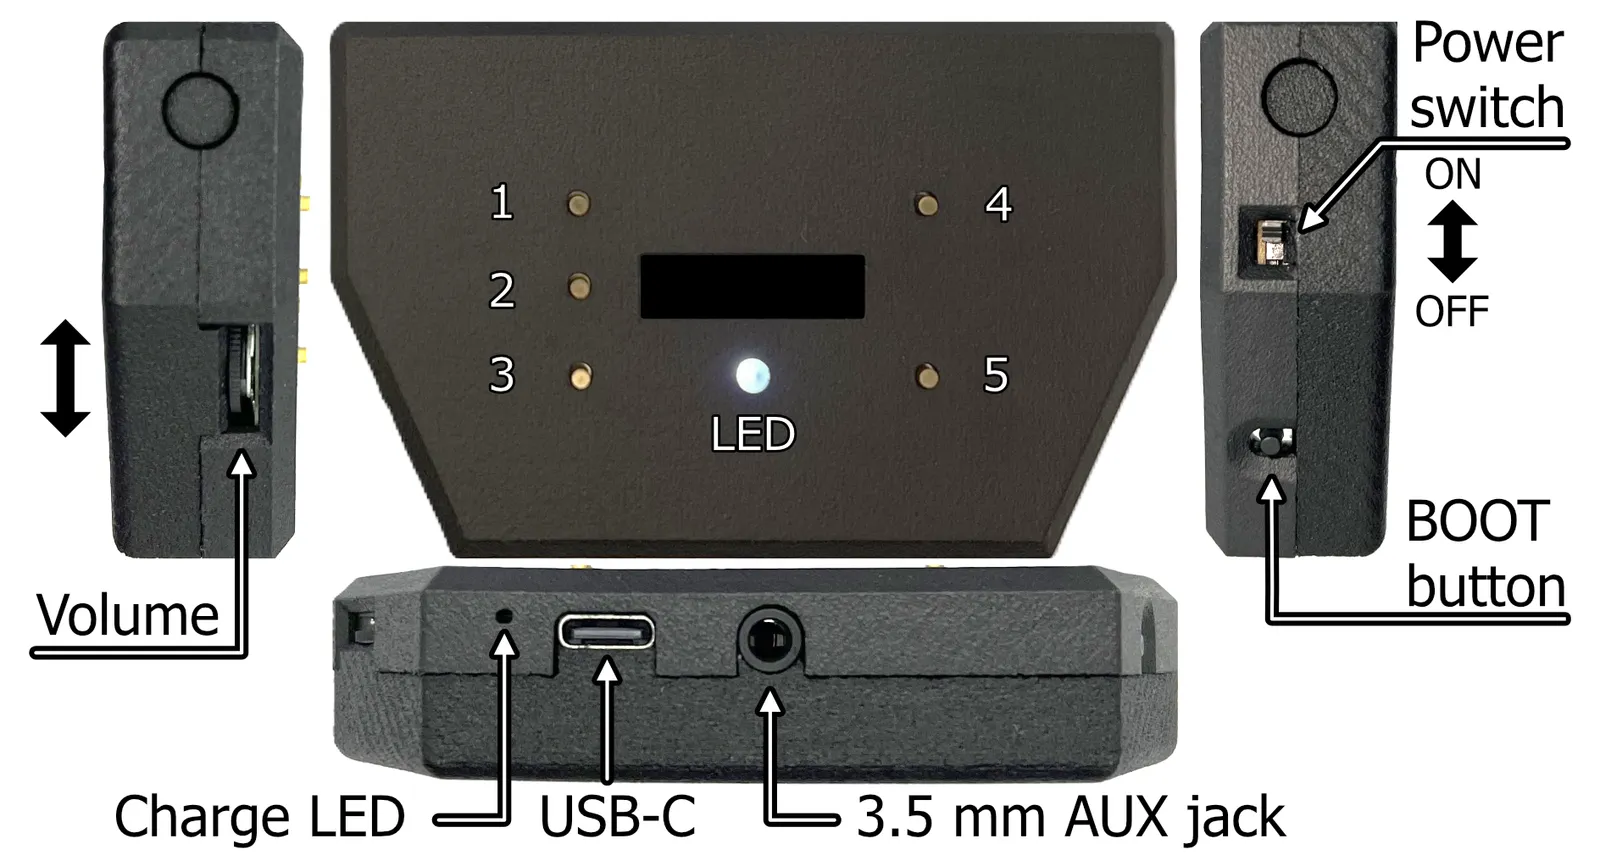
Features
Section titled “Features”- Neck-worn, 2-channel independent drive — delivers separate haptic feedback to left and right
- Wi-Fi UDP reception for direct communication with PC / Quest / smartphones (no relay server or PC pairing required)
- OLED display + physical buttons to switch Wi-Fi, change Player / Group numbers directly on the device
- USB-C charging + automatic battery level reporting
- Firmware is pre-flashed at the factory — users do not need to write any source code
Wearing Tips
Section titled “Wearing Tips”- Rest the neckband on the base of your neck and adjust so the vibration elements sit above your collarbone
- If vibration feels weak, fine-tune the position
- Wearing it over clothing is fine, but thin fabric transmits vibration more effectively
Band WL
Section titled “Band WL”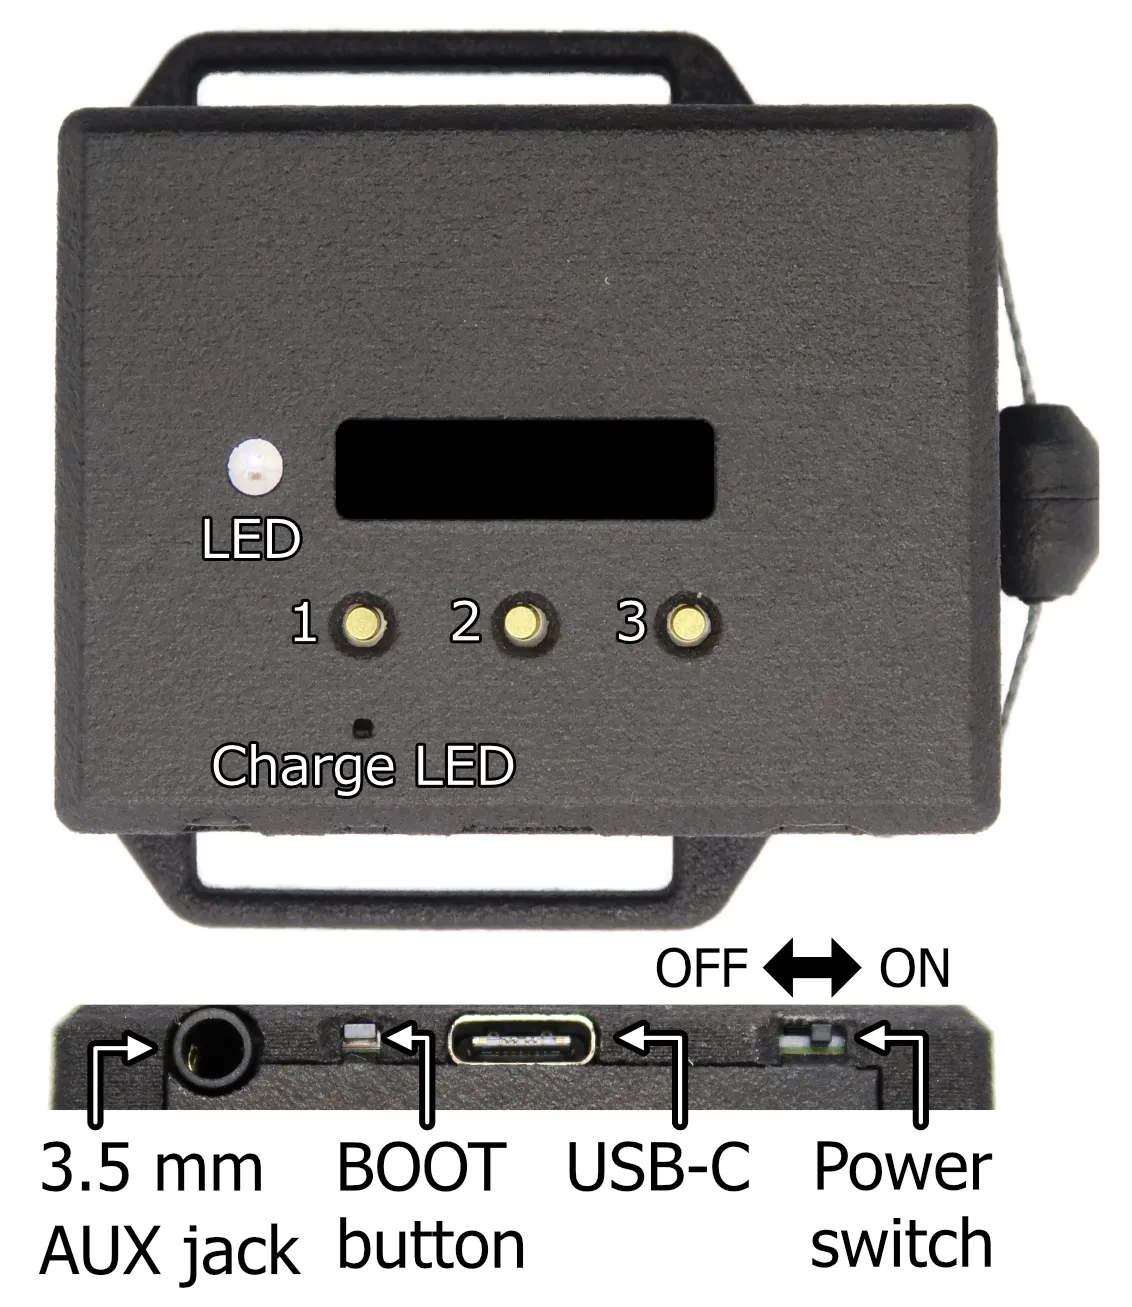
A single-channel variant worn on the wrist or ankle. Intended for use with smartphones or lightweight apps.
Button Operations
Section titled “Button Operations”Hapbeat lets you switch Wi-Fi and change Player / Category settings using the physical buttons alone. Assignments can be changed from the Settings tab in Studio; the factory defaults are as follows.
Duo WL (Necklace, 5 buttons)
Section titled “Duo WL (Necklace, 5 buttons)”| Position | Studio ID | Default Function |
|---|---|---|
| Top-left | btn_1 | Category UP |
| Middle-left | btn_2 | Mode Toggle (Volume ↔ Fix) |
| Bottom-left | btn_3 | Category DOWN |
| Top-right | btn_4 | Channel UP (Player) |
| Bottom-right | btn_5 | Channel DOWN (Player) |
Volume is adjusted with the analog volume knob on the side of the device.
Band WL (3 buttons)
Section titled “Band WL (3 buttons)”| Position | Studio ID | Volume Mode | Fix Mode |
|---|---|---|---|
| Left | btn_l | Volume UP | Category NEXT |
| Center | btn_c | Mode Toggle | Mode Toggle |
| Right | btn_r | Volume DOWN | Channel NEXT |
The center button toggles between Volume mode / Fix mode on the Band, swapping the roles of the left and right buttons. The current mode is shown on the OLED.
Each button supports separate actions for short press / long press / Hold. For details and customization, go to Manage → Settings in Studio.
OLED / LED Indicators
Section titled “OLED / LED Indicators”| Indicator | State |
|---|---|
| LED solid red | Charging |
| LED solid green | Fully charged |
| LED off (power on) | Normal operation |
Key OLED Elements
Section titled “Key OLED Elements”| Display | Meaning |
|---|---|
Cat_N | Current Category number |
CH_N | Current Channel (Player) number |
Gr:NN | Group ID (used in multiplayer LAN) |
vNN | Current Volume level (0–99) |
| App name | Name of the connected app (sent by Unity SDK, etc.) |
BAT + bar meter | Battery level (5 steps) |
For details on the mapping between OLED layout and sender-side addresses, see Address System.
Switching SoftAP Mode
Section titled “Switching SoftAP Mode”To use Hapbeat as a Wi-Fi access point (SoftAP) in environments without a router — for example, connecting directly to a VR HMD — you can switch modes using the physical buttons.
| Model | Combo | Action |
|---|---|---|
| Duo WL | Hold middle-left (btn_2) + bottom-right (btn_5) for 3 seconds | Toggles between STA ↔ AP mode and reboots |
| Band WL | Hold center (btn_c) + right (btn_r) for 3 seconds | Toggles between STA ↔ AP mode and reboots |
While holding, the OLED shows a countdown: AP in 3... / STA in 3.... Release early to cancel.
- When AP mode activates: starts an access point with SSID
Hapbeat-XXXXXX(XXXXXX = last 6 digits of MAC). Connect your HMD or PC to this SSID. The AP password can be set in Studio or via theap setserial command (if not set, the AP is open). - When returning to STA mode: automatically reconnects to registered Wi-Fi profiles.
- If no client connects for 10 minutes, AP mode times out and automatically returns to STA.
Wi-Fi Setup
Section titled “Wi-Fi Setup”Initial Wi-Fi configuration and adding SSIDs is done through the Studio onboarding wizard. A USB Serial connection is required.
Related Links
Section titled “Related Links”- Initial Setup — Wi-Fi setup and firmware flashing after receiving the device
- Specifications & Certifications — MCU / communication / battery / radio certification
- Care Guide — charging, cleaning, handling precautions
- Troubleshooting — device won’t start / no vibration / known issues
- Architecture Overview — Relationship between Hapbeat, Studio, and the SDK