Integrating into Your Project
Once you have completed Getting Started, you are ready to integrate the SDK into your own project.
Showcase Sample
Section titled “Showcase Sample”Real-world examples of haptic wiring patterns are available in the Showcase sample.
Import Showcase from the Samples tab in Package Manager → open
Showcase.unityand press Play. See Showcase Sample for details.
Integration follows two broad stages. This page gives an overview; each section links to the dedicated page for details.
- Wiring — Connect in-game events to the haptic feedback you want to play
- Tuning — Configure the playback mode (Fire / Clip), intensity, target device, and dynamic modulation
1. Wiring
Section titled “1. Wiring”This stage connects in-game events (button clicks, collisions, Animator state transitions, etc.) to entries in the EventMap (the haptic feedback to play).
1-1. Initial scene setup
Section titled “1-1. Initial scene setup”Run Hapbeat → Initial Scene Setup from the menu bar. This creates the following in one step:
Assets/HapbeatSDK/folder layout (Kits / EventMaps / Scenes)[Hapbeat Event Router]GameObject (contains theHapbeatManagersingleton)Assets/HapbeatSDK/EventMaps/<scene-name>-EventMap.asset- Opens the Event Map window with the new asset selected
Running it again on an already-configured scene is safe — the existing Router and EventMap are reused without duplication. For individual operations such as “add only the Router” or “add only the EventMap”, see Editor Menu Reference.
1-2. Define entries in EventMap
Section titled “1-2. Define entries in EventMap”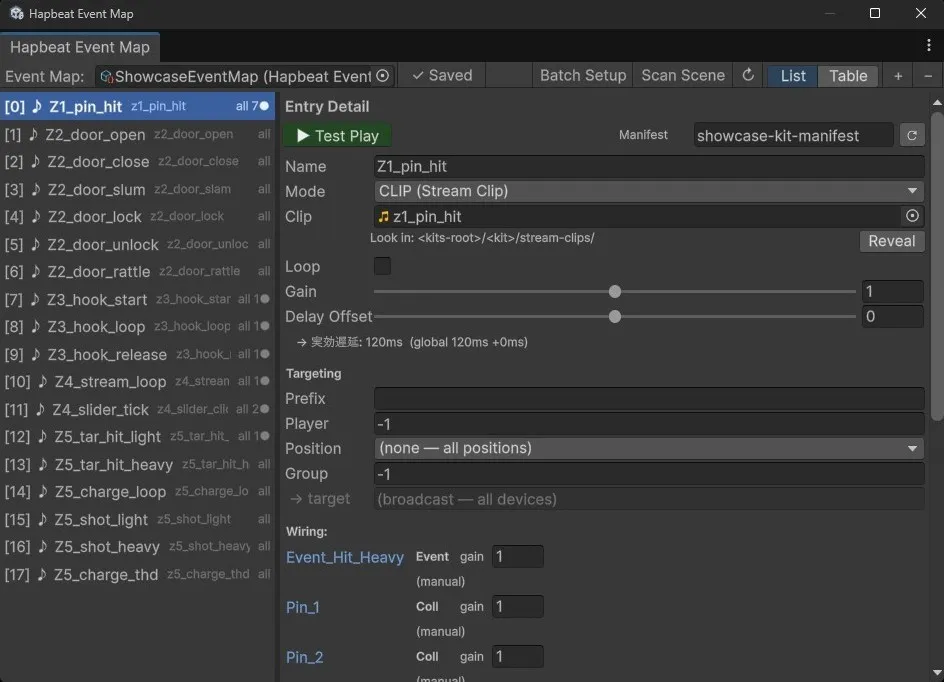
Open Hapbeat → Open Event Map and click + Add Event to add entries (opening the window alone does not create an asset — the asset from step 1-1 is assumed to exist).
Key fields (frequently used fields only; see EventMap Window for the full list including loop, bindings, delayOffsetSeconds, notes, and manifestOverride):
| Field | Description |
|---|---|
| Name | Human-readable label for display in the Editor |
| Mode | FIRE (Command) — play device-stored audio by IDCLIP (Stream Clip) — send a Unity AudioClip as PCM |
| Event ID | The command to send |
| Clip | The AudioClip to send in StreamClip mode |
| Gain | Vibration intensity (0.0–2.0, multiplied against the Kit manifest intensity) |
| Targeting | Destination (empty = all devices; player_1 / */pos_neck / player_1/pos_chest, etc.) |
1-3. Wire in-game events to entries
Section titled “1-3. Wire in-game events to entries”Configure when during gameplay each entry is invoked. There are three approaches — choose based on your project’s scale, team composition, and existing code (combining them is also fine).
A. Via components / Behaviours (wired in Inspector)
Section titled “A. Via components / Behaviours (wired in Inspector)”Attach a Hapbeat Trigger component (or HapbeatStateBehaviour) to a GameObject and select the EventMap entry in the Inspector. No code required. Zones Z1–Z5 in the Showcase sample each demonstrate a different pattern.
| Component / Behaviour | Use case | Reference Showcase Zone |
|---|---|---|
| HapbeatCollisionTrigger | Physics collision / Trigger Enter / Exit. VelocityScaled links intensity to impact force | Z1 Bowling (6 Pins set up via BatchSetup) |
| HapbeatStateBehaviour | Fires on Animator state Enter/Exit. Attach directly to a state as a StateMachineBehaviour | Z2 Door (attached to Open / Closed states) |
| HapbeatSequenceTrigger | Manages Grab / Hold / Release in a single component | Z3 Fishing (Sequence + ParameterBinding) |
| HapbeatTickEmitter | Snap-fires based on the magnitude of change in a continuous value (Slider, etc.) | Z4 Stream Console (Slider via BatchSetup) |
| HapbeatUnityEventTrigger | Calls Fire() from any UnityEvent. Button / XR Interactable / Animation Event, etc. | Z5 Charge (TargetReceiver.OnHit → Fire) |
Component details: Trigger Components
B. Call Trigger from script (via EventMap)
Section titled “B. Call Trigger from script (via EventMap)”Hold a Trigger reference in your script and call trigger.Fire() from game logic. Because it goes through an EventMap entry, gain / target / latency / manifest intensity compensation all apply automatically. Writing to GainMultiplier every frame enables dynamic modulation.
public class ChargeShooter : MonoBehaviour{    [SerializeField] private HapbeatUnityEventTrigger _trigger;    [SerializeField] private AnimationCurve _gainCurve;
    void Release(float chargeT) {        _trigger.GainMultiplier = _gainCurve.Evaluate(chargeT);        _trigger.Fire();    }}
Reference implementation: Showcase Z5 ChargeShooter (Samples~/Showcase/Scripts/ChargeShooter.cs).
The distinction from A is whether the firing condition is fully expressible as an Inspector declaration or requires calculation in script logic. Both approaches can coexist.
C. Call Manager.Play() directly, bypassing EventMap (special cases)
Section titled “C. Call Manager.Play() directly, bypassing EventMap (special cases)”A direct path exists via HapbeatManager without going through EventMap.
HapbeatManager.Instance?.Play("my-kit.enemy_hit", gain: 0.8f);This path loses the advantages of EventMap-based management (designers can adjust values in the Inspector, the full wiring list is visible, latency compensation applies automatically, etc.). Reserve it for situations where EventMap cannot scale to the required volume or dynamic nature.
For example: managing heartbeats for 100 players individually with per-player IDs. Statically enumerating them in EventMap would require hundreds of entries and make GUI management impractical; additionally, Event IDs must be constructed dynamically at runtime (Play($"heartbeat.player_{id}")). That combination is where C is appropriate.
2. Tuning
Section titled “2. Tuning”Once wiring is in place, design the playback mode, intensity, and target device for each entry. Most settings are edited in EventMap Window. This page gives an overview; follow the links for details.
2-1. Choose Fire (Command) or Clip (StreamClip)
Section titled “2-1. Choose Fire (Command) or Clip (StreamClip)”Select via the Mode field on the EventMap entry:
- Fire (Command) — Invokes a Kit already deployed to the device by ID. Low latency; sends only a short command.
- Clip (StreamClip) — Sends a Unity
AudioClipvia UDP for playback. No Kit deployment needed; dynamic modulation supported.
Starting with Clip for rapid prototyping, then switching to Fire once the design is finalized, is the recommended workflow. Decision criteria: Fire vs. Clip — When to Use Each.
2-2. Gain and Target
Section titled “2-2. Gain and Target”- Gain acts as a multiplier against the
intensityin the Kit manifest (the reference vibration intensity set when designing the Kit in Hapbeat Studio).1.0plays at the manifest level;0.5plays at half. See Build and Distribute a Kit for details on the gain hierarchy. - Target specifies the destination device. Empty = all devices;
player_1= a specific player;*/pos_neck= the neck position on all players;player_1/pos_chest= a specific player + body position, etc. See the contracts addressing spec for the full reference.
2-3. Dynamic modulation (Parameter Binding / script)
Section titled “2-3. Dynamic modulation (Parameter Binding / script)”A mechanism for writing gain / pan on every frame during StreamClip playback so it tracks game state (movement, velocity, distance, etc.).
- Parameter Binding — Declaratively map Transform / Rigidbody / Slider etc. to gain / pan in the Inspector (Showcase Z3 / Z4)
- Script — Write
trigger.GainMultiplier = curve(t)every frame (Showcase Z5)
Details and guidance: Parameter Binding
Next steps
Section titled “Next steps”- Trigger Components — Configuration examples for each trigger
- EventMap Window — Visualize and manage wiring in one place
- Parameter Binding — Dynamically map game state to gain / pan
- AI-Assisted Integration — Practical workflow for retrofitting haptics onto an existing scene
- Editor Menu Reference — Quick reference for all Hapbeat menu items
- Targeting — How to split by player / position / group for your setup